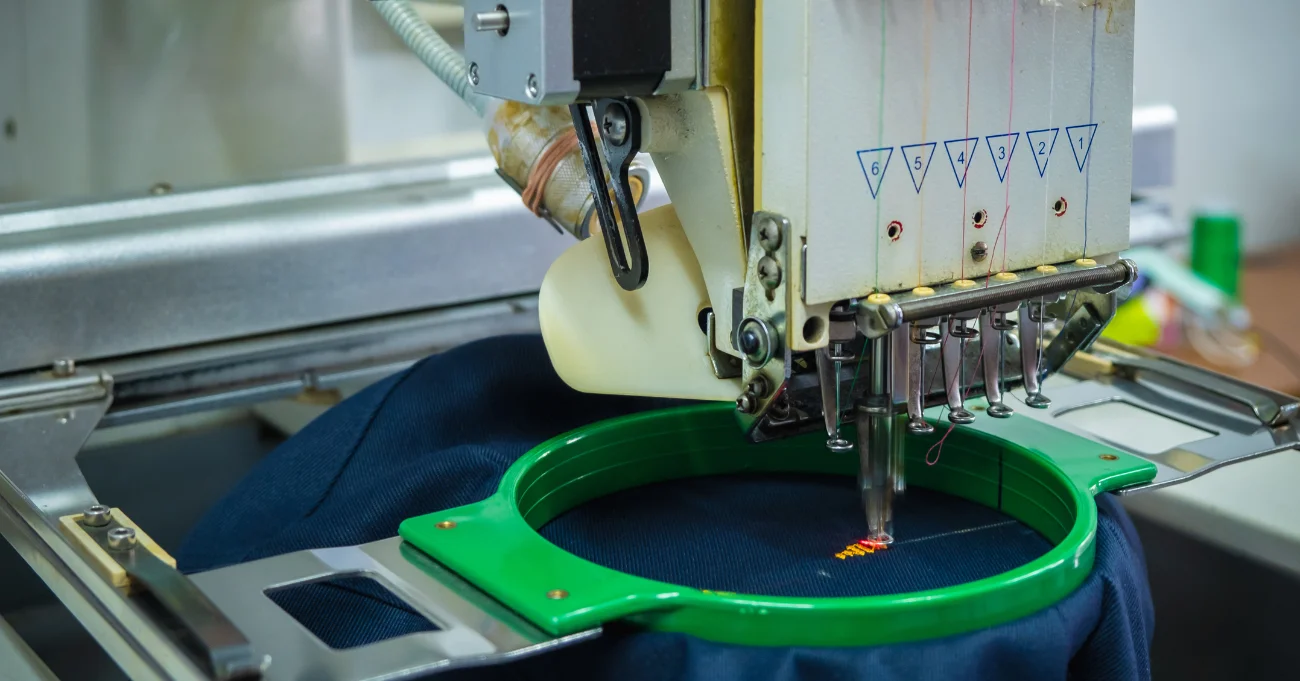
Learning how to digitize for embroidery is crucial for creating precise and detailed designs. Digitizing involves converting vector art into a format readable by embroidery machines. Using the right digitizing software, one can turn a design file into an embroidery. The process requires careful artwork preparation, choosing suitable stitches, and setting the correct machine parameters to ensure a quick turnaround time.
At Scalable Press, we provide an extensive print vendor network, delivering custom embroidery designs with a quick turnaround time. We offer competitive pricing and no minimum orders. Our team uses advanced embroidery software to transform vector images into stitch-perfect embroidery files. We handle minor edits swiftly to meet your specific requirements. Our digitizing work ensures your design file is ready for machine embroidery in record time.
Implementing our expertise in custom embroidery design, we’ve put together this guide to help you understand how to digitize for embroidery. Following that, we will highlight common mistakes in doing so and provide practical ways to avoid them. At the end of this blog, you will know how to execute embroidery digitizing services effectively and produce top-quality apparel.
Let’s get started!
Getting Started with Embroidery Digitization
Embroidery digitization transforms artwork into a digital file that embroidery machines read. This process involves various steps and requires specific hardware, software, and materials. Understanding these requirements ensures a smooth and efficient digitization process, producing high-quality embroidered promotional products.
Hardware Requirements
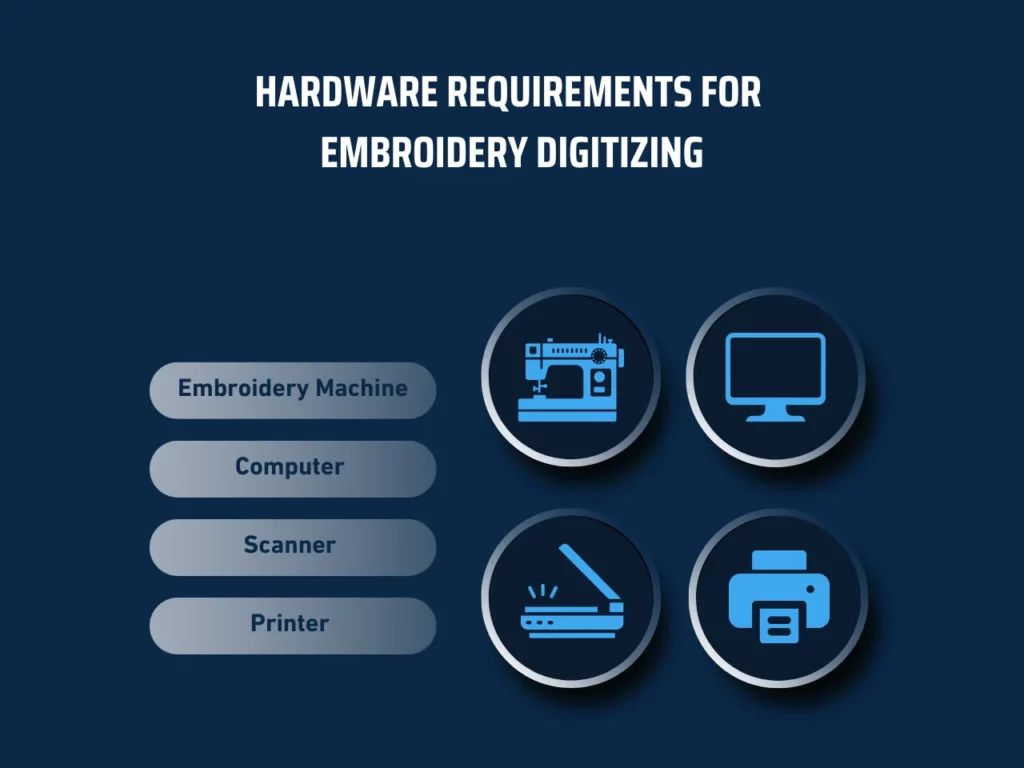
Digitizing for embroidery involves acquiring the necessary hardware. Utilizing the right hardware ensures the embroidery digitizer operates efficiently and produces precise designs.
- Embroidery Machine: An essential tool for any embroidery digitizer. Choose a machine that matches your production needs and supports various file formats like PNG and JEF.
- Computer: A reliable computer handles digitizing software and large design files. Ensure it has enough RAM and storage capacity for smooth operation.
- Scanner: This tool is useful for converting physical artwork into digital files. High-resolution scanners capture detailed images necessary for accurate digitizing.
- Printer: While digitizing focuses on embroidery, having a printer aids in creating physical copies of designs for reference and approval.
Software Requirements

Digitizing for embroidery requires specialized software to convert artwork into stitch files. These programs offer various tools to refine and perfect designs.
- Digitizing Software: Core to the digitization process. Popular options include Wilcom, Hatch, and Brother PE-Design. These programs support file formats and offer automatic lettering and applique creation features.
- Graphic Design Software: Programs like Adobe Illustrator or CorelDRAW help create and refine initial artwork. These tools ensure designs are clean and suitable for digitization.
- File Conversion Tools: Software that converts graphic files like PNG and JPEG into embroidery formats like JEF. This step is crucial for compatibility with embroidery machines.
- Design Management Software: Tools that organize and manage design files. They streamline workflow and ensure easy access to designs when needed.
Materials Needed
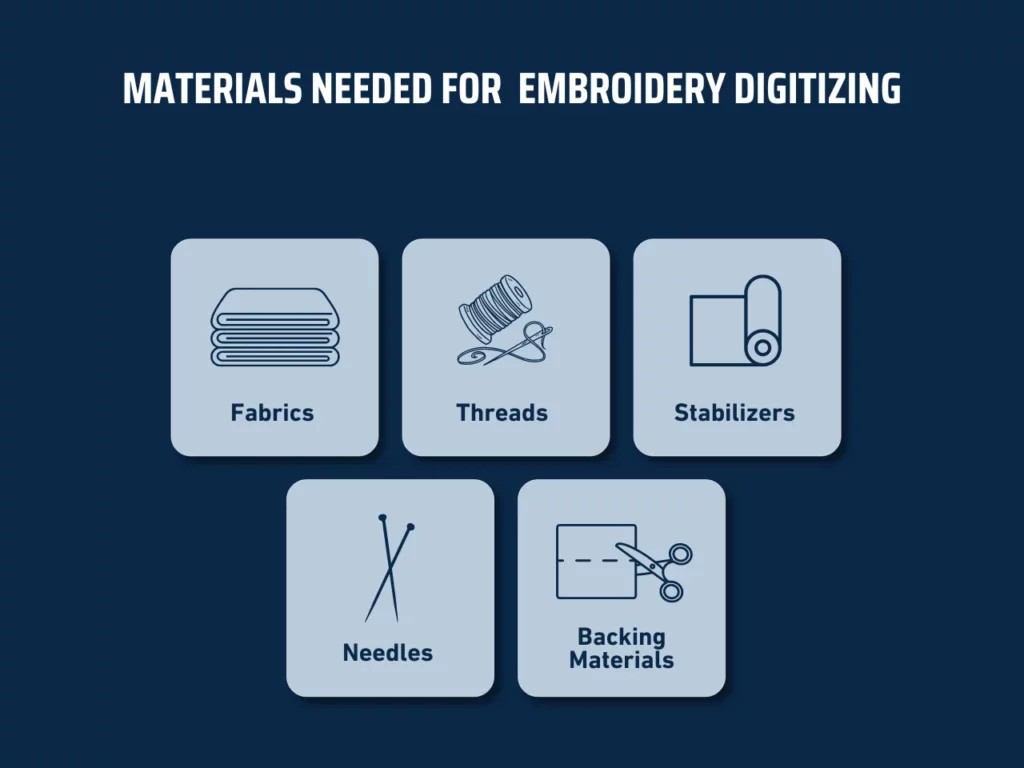
The quality of materials impacts the final embroidered product. Choosing the right fabrics, threads, and accessories ensures durable and visually appealing embroidery.
- Fabrics: These are the base material for embroidery. Choose fabrics suitable for your project, such as cotton for shirts or polyester for promotional products. Each fabric type requires different stitch densities and settings.
- Threads: Threads are essential for sewing the design. Opt for high-quality options like rayon or polyester to ensure vibrant colors and durability. Ensure threads match the design specifications.
- Stabilizers: These are the materials placed under the fabric during embroidery. They prevent shifting and stretching, ensuring clean and precise stitching. Choose stabilizers based on fabric type and design complexity.
- Needles: Select needles appropriate for the fabric and thread. Needle size and type affect stitch quality and fabric integrity.
- Backing Materials: Depending on the project’s requirements, choose from cutaway, tear-away, or water-soluble backings to support the fabric during embroidery.
Digitizing for embroidery involves a meticulous process. Ensure you have the proper hardware, software, and materials. Each component plays a crucial role, from the embroidery machine to the fabric—high-quality digitization results in professional and appealing embroidered promotional products.
How to Digitize for Embroidery: Essential Steps to Digitizing Your Design
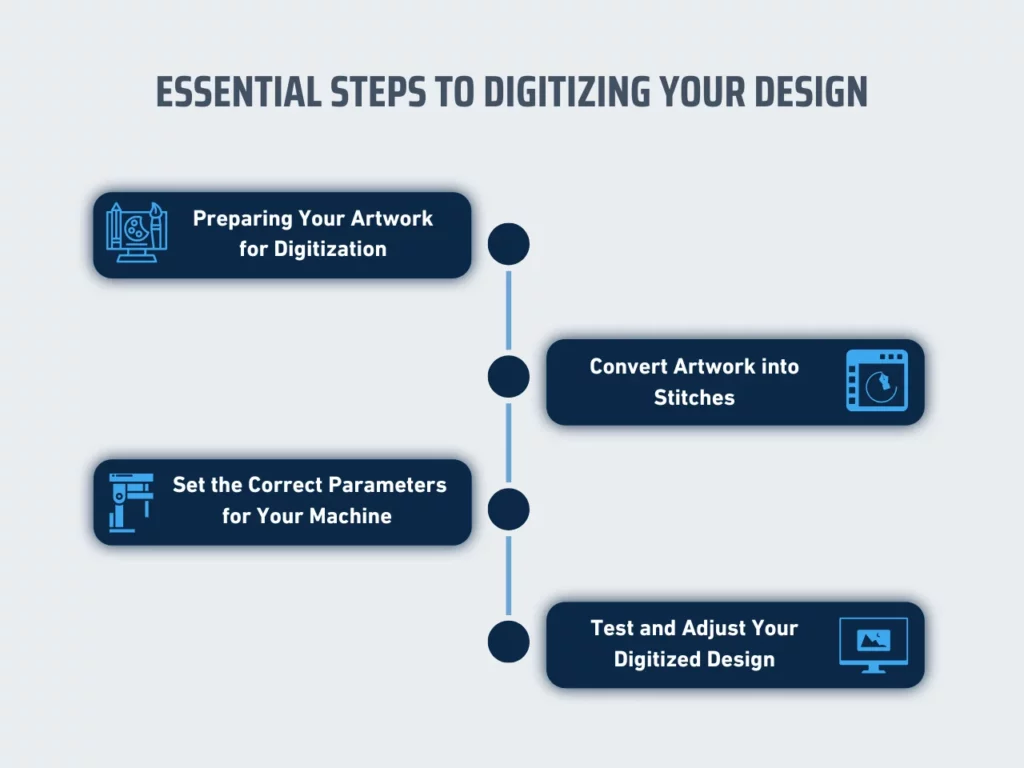
Learning how to digitize for embroidery transforms your artwork into stunning embroidered designs. This essential skill involves converting images into a format suitable for embroidery machines, ensuring high-quality results. Here, we’ll explore the four crucial steps in digitizing, helping you achieve excellent embroidery outcomes every time.
Step 1: Preparing Your Artwork for Digitization
Selecting and preparing artwork for digitizing for embroidery involves careful planning. Simplify the design, focusing on key elements. Avoid intricate details that may not translate well into embroidery. Opt for bold lines and clear shapes to ensure the design remains recognizable when stitched. Color choices are also crucial, so select colors that contrast well and suit thread work.
Here are the key steps to digitize for embroidery:
- Simplify the Design: Remove unnecessary details to make the design more embroidery-friendly.
- Choose Suitable Colors: Select thread colors that match the design and offer good contrast.
- Convert to Vector Format: Use software to convert the artwork into a vector format for precise digitization.
- Set Up Stitch Types: Determine the appropriate stitch types for different design parts.
- Test the Design: Create a sample embroidery to ensure the digitized design works well on fabric.
Converting artwork to a vector format ensures precision in digitizing for embroidery. This step is critical as it allows for accurate resizing without losing quality. Use software like Adobe Illustrator or CorelDRAW for this process. Once in vector format, the design is ready for the following stages.
Step 2: Convert Artwork into Stitches
Converting artwork into stitches involves transforming the prepared design into a format that embroidery machines can read. This step is critical in digitizing the embroidery process. The choice of stitch types and directions significantly impacts the final output. Begin by importing the vector design into embroidery software.
Here are the essential steps to convert artwork into stitches:
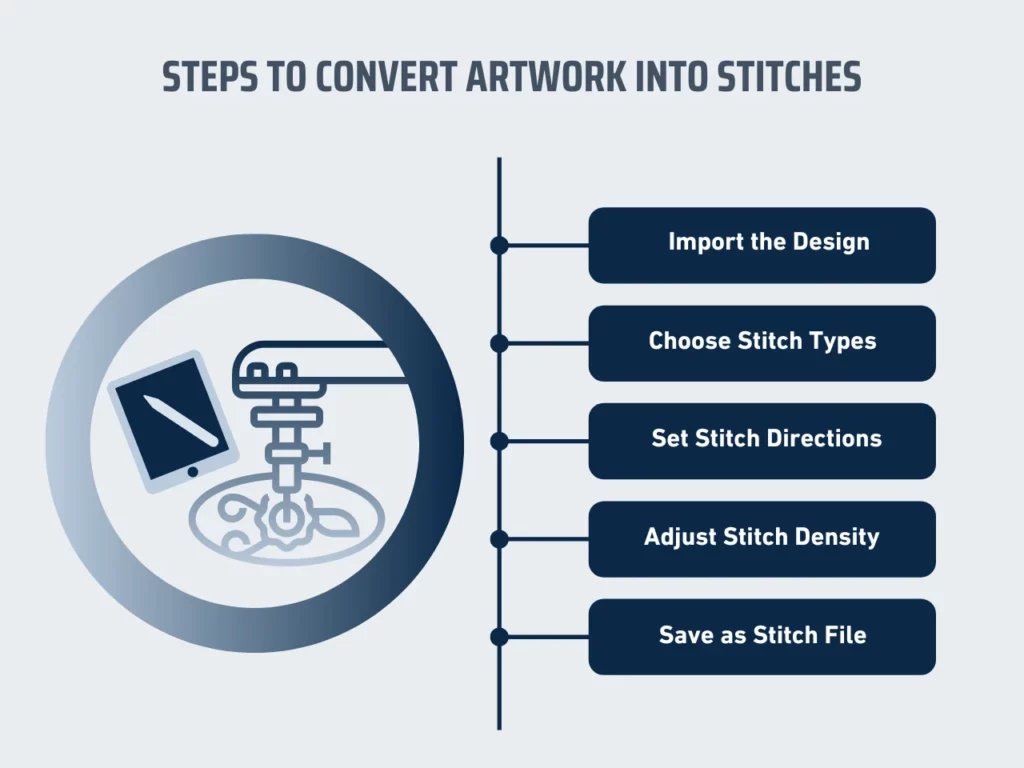
- Import the Design: Load the vector design into embroidery software.
- Choose Stitch Types: Select appropriate stitch types for various design parts.
- Set Stitch Directions: Determine stitch directions to enhance the design’s texture and appearance.
- Adjust Stitch Density: Modify stitch density to ensure optimal coverage without bulk.
- Save as Stitch File: Export the design as a stitch file compatible with the embroidery machine.
Choosing the right stitch types is crucial. For example, satin stitches are used for outlining and small details, while fill stitches work well for larger areas. The choice of stitch types can affect the texture and durability of the embroidery. It’s important to experiment with different types to see what best suits the design.
Additionally, setting stitch directions adds dimension to the embroidery. Different stitch directions can highlight various design elements, making it more visually appealing. Adjusting stitch density is also essential to avoid overly dense areas that might cause puckering. Once satisfied with the settings, save the design as a stitch file that is ready for embroidery.
Step 3: Set the Correct Parameters for Your Machine
Setting the correct parameters for your embroidery machine is vital for achieving high-quality results. Adjust thread tension to match the fabric and thread type. Incorrect tension can cause thread breaks or uneven stitches. Also, ensure the stitch density suits the fabric, as too dense stitching may damage the material, while too loose stitching can result in gaps.
Follow these essential steps in setting the correct parameters for your machine:
- Adjust Thread Tension: Fine-tune tension to prevent thread breaks and ensure smooth stitching.
- Set Stitch Density: Choose an appropriate density to avoid fabric damage or gaps.
- Regulate Machine Speed: Adjust the speed based on the complexity of the design and fabric type.
- Select Needle Size: Use the right needle size to match the fabric and thread.
- Choose Proper Stabilizer: Use a stabilizer that supports the fabric and maintains design integrity.
Selecting the proper needle size is also essential when setting parameters. A too-large or too-small needle can affect the embroidery’s quality. Use needles that complement the fabric and thread. Choosing the right stabilizer also helps maintain fabric stability during embroidery, ensuring a smooth and accurate design.
Step 4: Test and Adjust Your Digitized Design
Testing your digitized design on similar fabrics is crucial. This step helps identify any issues with the design or the digitization process. Use the same fabric and thread intended for the final product to ensure accuracy in the test. Testing allows you to see how the design will look when embroidered and reveals any potential problems.
Ensure to follow this simplified guide as you test and adjust your digitized design:
- Create a Sample Embroidery: Stitch the design on a fabric similar to the final product.
- Evaluate the Outcome: Check the sample for issues like puckering, misalignment, or thread breaks.
- Identify Problem Areas: Note areas where the design may need adjustments, such as stitch density or type.
- Adjust the Design: Use embroidery software to make necessary corrections.
- Retest the Design: After adjustments, create another sample to ensure all issues are resolved.
Troubleshooting common issues during testing is essential. Problems like puckering may indicate too dense stitches or improper stabilizer use. Misalignment often results from incorrect embroidery hooping or design setup. Identifying these issues early saves time and resources.
Common Mistakes to Avoid in Embroidery Digitization
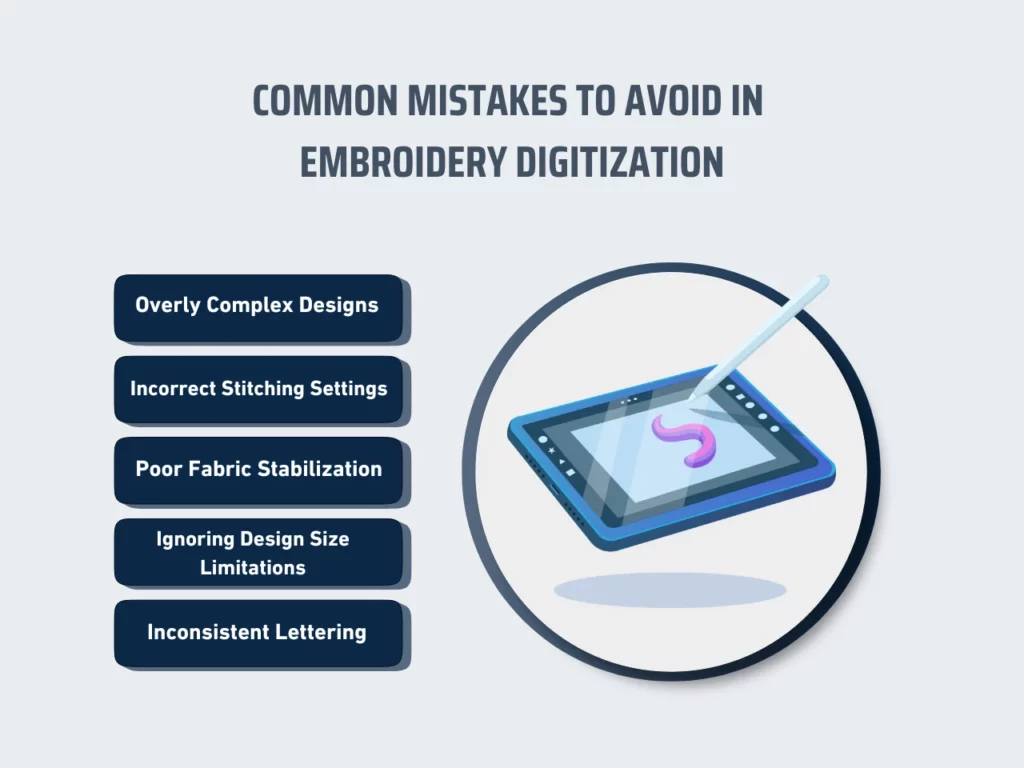
Embroidery digitization involves converting artwork into a format suitable for machine embroidery. While this process seems straightforward, beginners often encounter common pitfalls. Understanding these errors and how to avoid them ensures a smooth digitizing experience and professional results.
1. Overly Complex Designs
Beginners often select intricate designs with excessive details. Complex artwork can result in poor-quality embroidery that appears cluttered. Simplify designs for better clarity. Focus on essential elements and avoid small details that do not translate well into stitches. Streamlined designs ensure a cleaner and more professional finish.
2. Incorrect Stitching Settings
Incorrect stitching settings lead to inconsistent results. Errors such as improper stitch type or density affect the embroidery’s quality. Adjust stitch settings according to the design and fabric type. Use appropriate stitch types and densities. You can test different settings to determine the best combination for each project. Correct settings ensure uniform stitches and a polished appearance.
3. Poor Fabric Stabilization
Insufficient fabric stabilization causes distortion and misalignment during embroidery. Use the right stabilizer based on the fabric’s weight and type. Secure the fabric tightly in the hoop to prevent shifting. Proper stabilization maintains the design’s integrity and prevents puckering.
4. Ignoring Design Size Limitations
Beginners must pay more attention to size limitations when embroidering large designs on small garments. Match the design size with the garment’s available embroidery area. Scale designs appropriately to avoid crowding or stretching. Proper sizing ensures the design fits well and looks proportionate on the garment.
5. Inconsistent Lettering
Embroidering small or intricate lettering can result in unreadable text. Use larger, bold fonts for lettering. Avoid intricate fonts that lose clarity when embroidered. Be sure to test different fonts to find the most readable, appropriate option. Clear lettering enhances the overall design and ensures legibility.
Key Takeaway
Proper digitizing techniques are essential for mastering how to digitize for embroidery. These techniques ensure designs translate accurately from digital files to fabric. Understanding how to digitize a drawing for embroidery involves selecting the right artwork, converting it into stitches, and setting the correct machine parameters. Testing and adjustments refine the final product, ensuring professional results.
Factors to consider before starting include the complexity of the design, fabric type, and thread choices. These elements affect the quality and durability of the embroidery. Additionally, keep in mind that contract embroidery pricing can vary based on the intricacy of the digitized design and materials. Assessing these factors beforehand helps manage costs and meet client expectations.
Need more guidance on how to digitize for embroidery? Scalable Press will guide you through the entire process, ensuring your designs are stitched out perfectly. Our experts will handle the technical details by utilizing advanced technology and automation for fast turnaround. Explore our product catalog featuring 4,000+ products to find the best embroidered creations for your needs!